Introduction
Every desktop you have made so far came from a template, and you picked it off a list somebody else wrote.
That list is your centre's, it is short, and it is old.
Sooner or later an exercise needs something that is not on it: a Fedora when the centre has only Ubuntu, a machine with Docker already installed so that thirty students do not each spend ten minutes installing it, a base image with your own SSH key baked in.
A template is not magic. It is a desktop somebody stopped and froze:
architecture-beta
     service iso(disk)[ISO]
     service desktop(server)[Desktop]
     service template(database)[Template]

     iso:R -- L:desktop
     desktop:R -- L:template
Three steps, and this page is those three:
- get an installer ISO into Isard — the media library;
- install an operating system onto a desktop from it;
- promote that desktop into a template.
Then it does them all for you in one command.
The media library
Isard calls an uploaded ISO a medium, and every account has a library of them.
$ isard media

-- Media --
NAME                             STATUS      SIZE   OWNER
Fedora-Server-netinst-x86_64-44  Downloaded  1049M  you
ubuntu-24.04.4-live-server       Downloaded  3052M  shared
shared means somebody at your centre published it for everybody. you means you added it and it counts against your quota.
Adding one is a URL, not a file:
$ isard media add ubuntu-24 --url https://releases.ubuntu.com/24.04/ubuntu-24.04.4-live-server-amd64.iso
✓ Media registered
✓ Media id: 2b8f61c4-...
✓ Downloaded: ubuntu-24

✓ Media 'ubuntu-24' ready (id: 2b8f61c4-...).
Isard fetches it, not you. There is no upload route at all — you give the platform an https:// address and its own downloader pulls the file.
Which is a good thing on a school connection, and a constraint the first time you have an ISO on a USB stick and nowhere to put it.
The command waits by default and prints progress. --no-wait returns immediately, and then isard media is how you check on it.
Deleting is what you expect:
$ isard media delete ubuntu-24

⚠ About to delete media:
  Name : ubuntu-24
  ID   : 2b8f61c4-...
  State: Downloaded
Delete this media? [y/N] y
✓ Media deleted
By hand, in the browser
Now that there is an ISO in the library, you can boot a desktop off it.
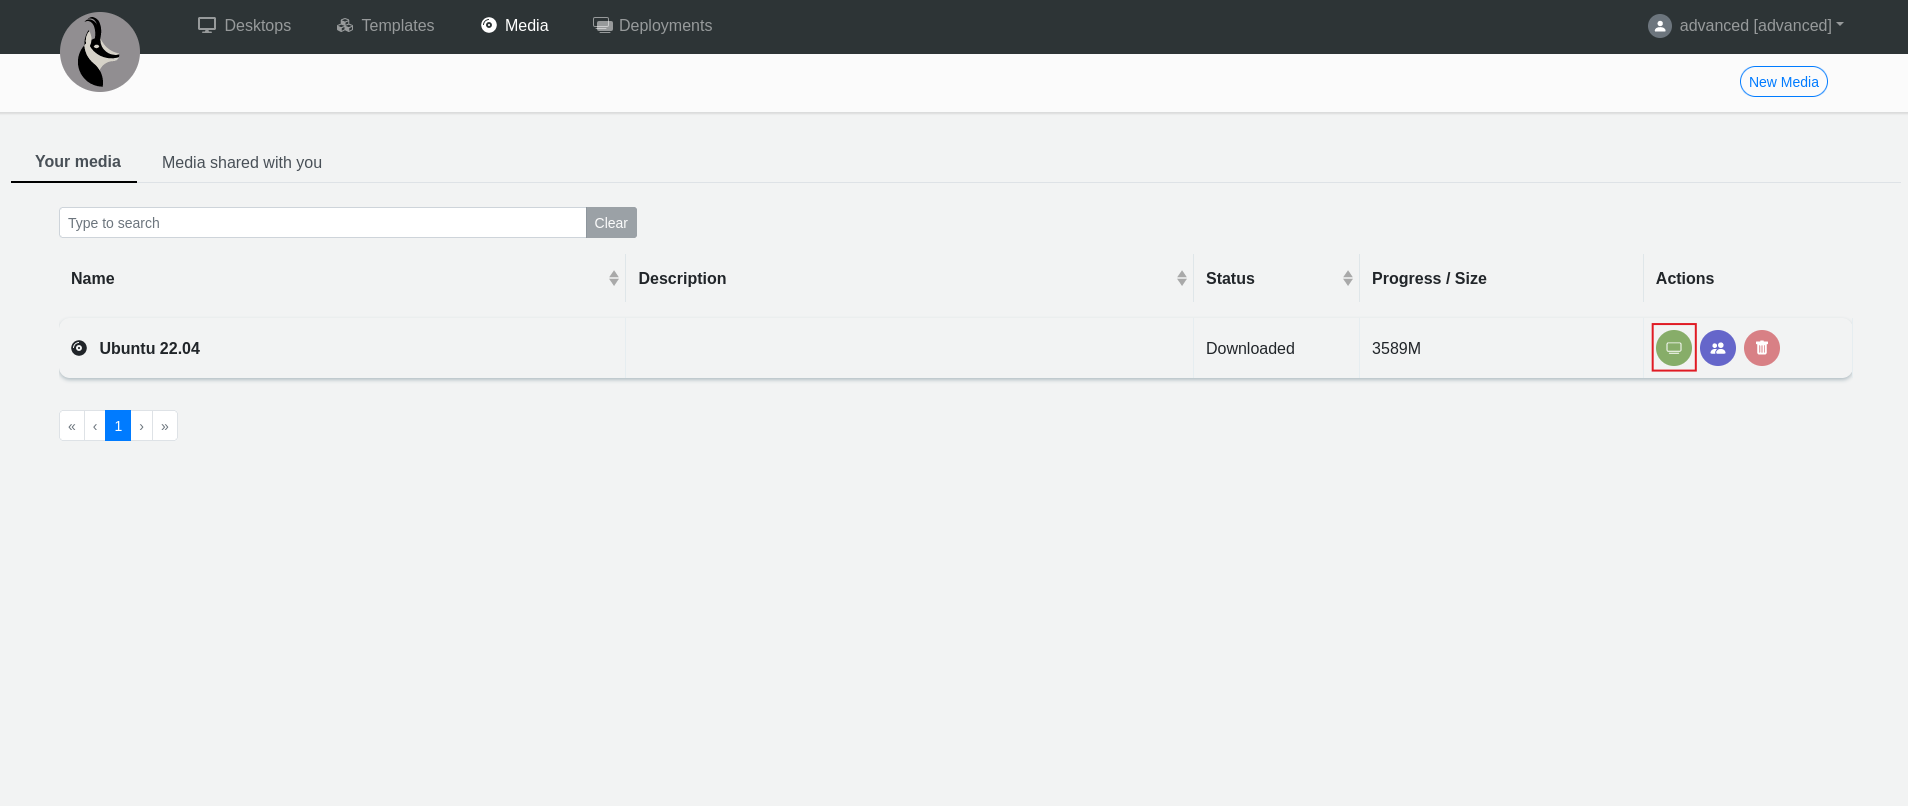
In the media view, the icon on the row generates a desktop from that medium:
It opens the ordinary create form, except that the boot device is the ISO rather than a template:
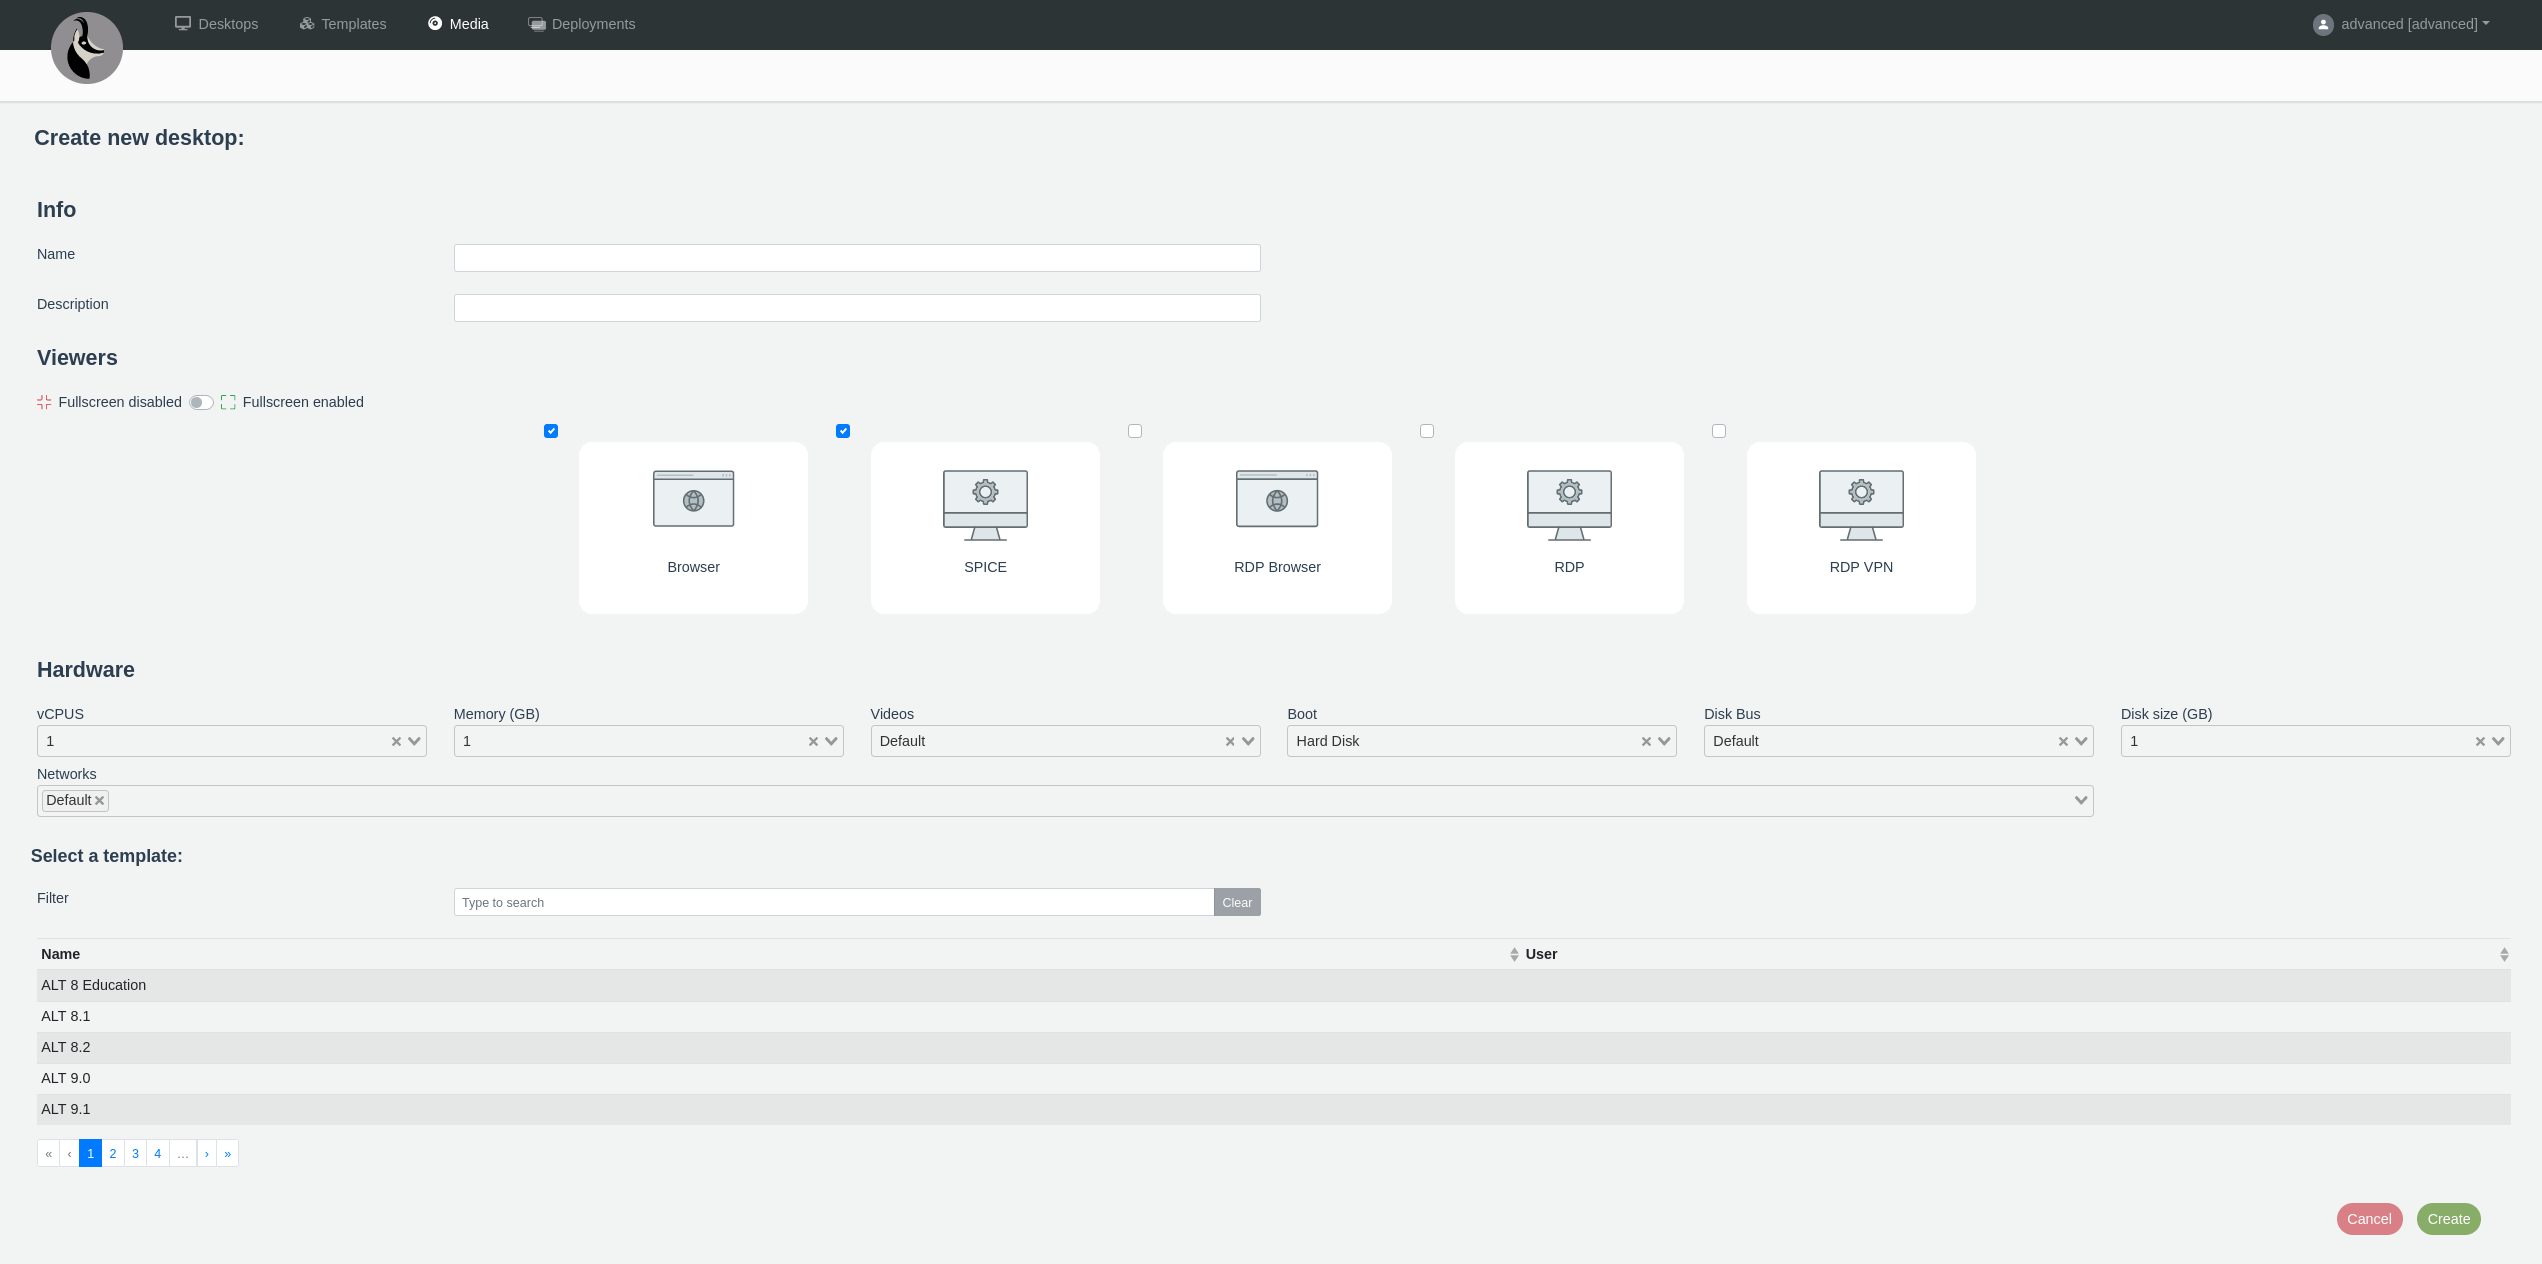
For a Fedora Server, the settings that matter are:
| Boot | CD/DVD |
| Disk bus | virtio |
| Disk | 100 GB |
| Network | Default and Wireguard VPN |
Start it, open the viewer, and install the operating system exactly as you would on a real machine.
Then — and this is the step people miss — stop the machine and edit it before doing anything else:
| Boot | Hard Disk |
| Media | None |
| Disk bus | Default |
If you skip that, the firmware finds the installer ISO again on the next boot and cheerfully offers to reinstall over what you just built.
Promoting
You now have a desktop with an operating system on it. Turning it into a template is one command:
$ isard template promote fedora-base --name fedora-44-base -d 'Fedora 44 Server, docker preinstalled'
✓ Resolved desktop: fedora-base

✓ Template 'fedora-44-base' created.
  Template ID : 5c1e9a07-...
  Source      : fedora-base (8d3a2f61-...)
  Enabled     : yes
Two conditions, and both are checked by the platform rather than by the tool:
- the desktop must be Stopped;
- its disk must actually have been written — a desktop created and never booted is not a valid source.
--disabled creates the template hidden, which is what you want if you are going to check it before letting a class use it.
The whole thing, in one file
Everything above is four commands, a form, an install and a promote, with two chances to get the boot order wrong.
isard build is all of it, described in one YAML file.
# ubuntu.yaml
image:
  distro: ubuntu
  variant: server
  release: lts

template:
  name: ubuntu-lts-base
  description: Ubuntu LTS with docker and the class tooling
  vcpus: 4
  memory_gb: 8
  disk_gb: 100

user:
  name: isard
  password_env: ISARD_TEMPLATE_PASSWORD
  ssh_key: ~/.ssh/id_ed25519.pub

packages: [git, curl, docker.io]
run:
  - systemctl enable --now docker
  - usermod -aG docker isard
Look at the plan before you spend an afternoon on it:
$ isard build ubuntu.yaml --dry-run
✓ Ubuntu 26.04.1 LTS Server (live-server)

Template : ubuntu-lts-base
Image    : Ubuntu 26.04.1 LTS Server (live-server), 2.9 GB
URL      : https://releases.ubuntu.com/resolute/ubuntu-26.04.1-live-server-amd64.iso
Hardware : 4 vCPU, 8 GB RAM, 100 GB disk
User     : isard
Install  : by hand in the viewer (user, password, SSH server)
Provision: hostname/locale/timezone, 3 package(s), 0 file(s), 2 command(s) over SSH
--dry-run touches the vendor's release index and nothing else — no session, no API call, no download.
It is the command to run after every edit to the file, because a typo in a key is an error, not a warning:
$ isard build ubuntu.yaml --dry-run
error: ubuntu.yaml: unknown key in `profile`: pakages
Allowed: files, hostname, image, keyboard, locale, packages, run, template, timezone, user
That strictness is deliberate. A silently ignored key is a key you discover twenty minutes into a 3 GB download.
Then run it:
$ isard build ubuntu.yaml
✓ Ubuntu 26.04.1 LTS Server (live-server)
...
  URL: https://releases.ubuntu.com/resolute/ubuntu-26.04.1-live-server-amd64.iso
✓ No existing media — will register
✓ Media registered
✓ Media id: 7d41c2e8-...
✓ Downloaded: ubuntu-26.04.1-live-server-amd64
✓ Created ubuntu-lts-base (c0a9e7b2-...)
✓ Bastion armed (applies at the next boot)
✓ Bastion will log in as 'isard'
✓ Desktop starting
✓ ubuntu-lts-base is now Started

In the viewer, install the OS. Three things have to match; the rest is yours:

  1. username     isard
  2. password     una-contrasenya-llarga
  3. SSH server   tick "Install OpenSSH server" in the installer

Then shut the machine down — the build resumes by itself the moment it stops.
Nothing else is needed: hostname, locale, timezone, packages, your SSH key
and passwordless sudo are all applied automatically afterwards.
The one step that is yours
The OS installer cannot be driven from the outside, so the build does not pretend to: it hands you the viewer and waits.
Three things have to match, and everything else is up to you:
| what | where | |
|---|---|---|
| 1 | the username from user.name |
the installer's account screen |
| 2 | the password from user.password |
the same screen |
| 3 | an SSH server | Ubuntu: tick Install OpenSSH server. Fedora: pick the Server environment |
Then shut the machine down. Do not reboot it.
The build is watching for the desktop to reach Stopped — it does not prompt you for anything, so you can walk away and it will carry on without you.
✓ ubuntu-lts-base is now Stopped
✓ Booting from disk
✓ Desktop starting
✓ ubuntu-lts-base is now Started
✓ SSH is up

Applying the profile over SSH:

==> hostname ubuntu-lts-base
==> timezone Europe/Madrid
==> account isard
==> authorising the SSH key for isard
==> installing 3 package(s)
...
==> systemctl enable --now docker
==> usermod -aG docker isard
==> provisioning complete
✓ Guest account 'isard' is ready
✓ Stop requested
✓ ubuntu-lts-base is now Stopped
✓ Bastion will log in as 'isard'
✓ Deleted 'ubuntu-26.04.1-live-server-amd64'

✓ Template 'ubuntu-lts-base' is ready.
  Template ID : 4f6b0d1a-...
  Guest user  : isard
  Create one  : isard create my-box --template ubuntu-lts-base
The username and password matter because the bastion logs into the guest with them, and it is how the build gets in afterwards to do the rest.
Get them wrong in the installer and the configure phase cannot log in — which is the one failure mode of this command that costs you the whole install.
When SSH never answers
Almost always the OpenSSH option was missed on the installer's screen.
The build knows what that looks like, and rather than timing out it prints the fix and waits for you to run it in the desktop's own console:
$ curl -fsSL https://isard.xtec.dev/guest.sh | sudo sh -s isard mypassword
That is the same one-liner from Bastion, and it is short on purpose — the console you have to type it into has no working clipboard yet, which is one of the things it fixes.
What else you can put in it
| key | what |
|---|---|
hostname, timezone, locale, keyboard |
the boring ones, applied over SSH |
packages |
a list, installed with the guest's own package manager |
run |
shell commands, in order, as root |
files |
paths and contents, written into the guest |
And three flags worth knowing:
--keep-media |
leave the ISO in the library, so the next build of the same release does not download 3 GB again |
--no-promote |
stop after the machine is built and configured, and leave it as a desktop |
--no-viewer |
do not launch a viewer; open the machine yourself |
Unattended, by hand
isard build handles the case you will actually meet.
Underneath it there is a lower-level path worth knowing exists, because it is how an install becomes fully unattended with nobody at the viewer at all.
Both Ubuntu's installer and Fedora's read their configuration off a second CD, and they find it by its volume label:
| label | file | read by | |
|---|---|---|---|
isard seed cidata |
CIDATA |
user-data |
cloud-init — Ubuntu autoinstall |
isard seed oemdrv |
OEMDRV |
ks.cfg |
Anaconda — Fedora, RHEL, Rocky |
Neither needs a kernel command line argument, which is the point: Isard's hardware form has nowhere to put one.
So you build the little ISO locally:
$ isard seed oemdrv --kickstart my-ks.cfg -o seed.iso
Wrote OEMDRV seed → seed.iso
Anaconda auto-loads ks.cfg from any volume labelled OEMDRV — no
kernel command-line tweak needed. Host the ISO, register via
`isard media add`, and attach alongside the Fedora installer ISO.
Host it somewhere over HTTPS, and hand the URL over:
$ isard template create --seed-url https://files.example.com/seed.iso
The installer boots, finds the second CD, reads it and installs without asking anything.
Exercises
TaskRead the library
List your media and say, for each one, whether it is yours or your centre's.
Show the solution
$ isard media
-- Media --
NAME STATUS SIZE OWNER
Fedora-Server-netinst-x86_64-44 Downloaded 1049M you
ubuntu-24.04.4-live-server Downloaded 3052M shared
The OWNER column is the answer, and it matters for two reasons: a shared medium costs you no quota, and you cannot delete one.
TaskA profile that fails cheaply
Write a build profile for a Fedora Server template with git and htop, and check it with --dry-run without building anything.
Then break a key on purpose and check again.
Show the solution
# fedora.yaml
image:
distro: fedora
variant: server
release: latest
template:
name: fedora-class
vcpus: 2
memory_gb: 4
disk_gb: 50
user:
  name: isard
  password_env: ISARD_TEMPLATE_PASSWORD
packages: [git, htop]
$ isard build fedora.yaml --dry-run
✓ Fedora 44 Server (Net Install)

Template : fedora-class
Image    : Fedora 44 Server (Net Install)
URL      : https://download.fedoraproject.org/pub/fedora/linux/releases/44/Server/x86_64/iso/Fedora-Server-netinst-x86_64-44-1.7.iso
Hardware : 2 vCPU, 4 GB RAM, 50 GB disk
User     : isard
Install  : by hand in the viewer (user, password, SSH server)
Provision: hostname/locale/timezone, 2 package(s), 0 file(s), 0 command(s) over SSH

$ isard build fedora.yaml --dry-run   # after renaming `packages` to `packge`
error: fedora.yaml: unknown key in `profile`: packge
Allowed: files, hostname, image, keyboard, locale, packages, run, template, timezone, user
The second run is the exercise. A profile that is wrong should be wrong in two seconds, not in twenty minutes.
TaskThree steps by hand
Without using isard build, turn a desktop into a template.
Use a machine you have finished with.
Show the solution
$ isard stop lab --wait
✓ Resolved desktop: lab (state: Started)
✓ lab → Stopping
✓ lab is now Stopped

$ isard template promote lab --name lab-base -d 'Class base image'
✓ Resolved desktop: lab

✓ Template 'lab-base' created.
  Template ID : 0e7d3b52-...
  Source      : lab (6a19c4f0-...)
  Enabled     : yes

$ isard template --filter lab

-- Available Templates (filtered by 'lab') --
NAME      DESCRIPTION       OS
lab-base  Class base image  ubuntu
And now check what isard list says about lab:
$ isard list --name lab
No desktops found.
The desktop is gone. It was consumed by the promote, and that is the behaviour to remember from this page.
TaskWhy not just share the disk
Your classmate wants the machine you built. You could promote it to a template, or you could give them the login and let them use yours.
Give two reasons the template is the right answer.
Show the solution
Any two of these:
- A template is a copy. Ten people each get their own machine and can break it. One shared machine is one person working and nine watching.
- It costs quota once per person, not once. A shared machine holds your quota for the whole class.
- It is reproducible. A machine you configured by hand over three weeks cannot be rebuilt; a template can be made again from a profile.
- Nobody has to trust anybody. Sharing a login means sharing a password, and the account it belongs to is yours.
The last one generalises well past this page, and the third one is the reason isard build exists at all.
Project
Build the machine your class will actually use.
- Write a build profile for an Ubuntu LTS server with the tools your course needs — say
git,curl,docker.ioandpython3. - Add a
run:step that adds the user to thedockergroup, and afiles:entry writing a/etc/motdthat names the template and the date. - Check it with
--dry-rununtil it is clean. - Build it with
--keep-media, so a second build does not download the ISO again. - Make a desktop from the finished template and prove that
docker run hello-worldworks withoutsudo.
Show the solution
# class.yaml
image:
  distro: ubuntu
  variant: server
  release: lts

template:
  name: class-base
  description: Ubuntu LTS with docker and python
  vcpus: 4
  memory_gb: 8
  disk_gb: 100

user:
  name: isard
  password_env: ISARD_TEMPLATE_PASSWORD
  ssh_key: ~/.ssh/id_ed25519.pub

hostname: class-base
timezone: Europe/Madrid

packages: [git, curl, docker.io, python3]
run:
  - systemctl enable --now docker
  - usermod -aG docker isard
files:
  /etc/motd: |
    class-base — Ubuntu LTS, docker + python
    Built 2026-08-14 with `isard build`.
$ export ISARD_TEMPLATE_PASSWORD='una-contrasenya-llarga'
$ isard build class.yaml --dry-run
$ isard build class.yaml --keep-media
Then:
$ isard create demo --template class-base --yes
$ isard start demo --wait
$ isard ssh demo -- 'docker run --rm hello-world'
Hello from Docker!
docker run without sudo is what proves the usermod ran, and it is worth checking rather than assuming: a group change only takes effect on a new login, and this is a new login.